Log into your m0n0wall and click IPsec , under VPN.

Ok now we need to add a VPN connection, to do this click on the
![]() icon.
icon.
You will be presented with a great form, I will be pasting screen shots of each section as we discuss it.
The first area is the one you use to establish what network ranges will use this IPsec tunnel.
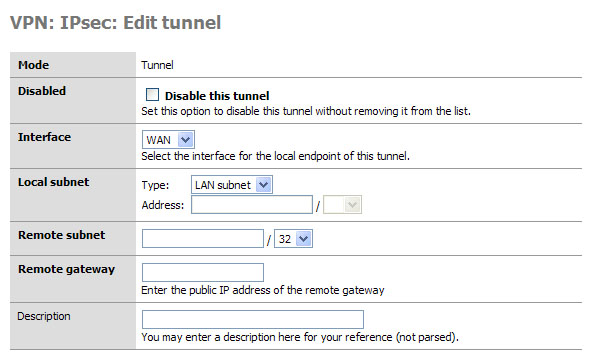
This is the first set of fields that we need to concentrate on. Later, when testing your tunnel, you can actually fail to establish level 2 connection if this data is incorrect. I will note what to pay particular attention to as we go along.
Mode, this is a hard set option and frankly you don’t need to change it (nor can you.)
Disabled, this is a great “on / off” button if you need to disable the tunnel for what ever reason. Simply select the edit or
 from the main VPN: IPsec window and click this
checkbox element, then select apply at the bottom of the page. When
you need the tunnel again, reverse the process.
from the main VPN: IPsec window and click this
checkbox element, then select apply at the bottom of the page. When
you need the tunnel again, reverse the process.Interface, this is how you determine which part of your network will be the termination point (end point) for the VPN Tunnel. If you are connecting to a remote server, then WAN is your option.
Local subnet. This is where you can set which parts, hosts, or the entire LAN can be accessed from the other side of the VPN tunnel. The easiest thing to do is to set the LAN subnet as the option; this means your entire LAN will be accessible from the remote network. IMPORTANT: The other end of the tunnel has this same field, well it probably has 99% of these fields actually, make sure the other end is set exactly as you set this end. E.g. if you said “Single host” in this section and entered the IP address of that host, the other person would set that host in his “Remote Subnet” field. The same goes for you, and with that mentioned we move to the next field.
Remote Subnet. This is more than just labeling which hosts and / or host you want to access on the other network, as mentioned in item 4 it is paramount that you set this exactly like the other end’s “local subnet” section. If not, level 2 of the VPN connection will fail and traffic will not pass from one VPN segment to the other.
Description: It is a good practice to always leave notes about why you are doing something. I suggest you enter something about what this VPN tunnel is used for, or about the remote end of the tunnel to remind yourself who/what it is.
Ok all the basic for the routing have been established. Now we move on to phase 1 of the VPN authentication process.
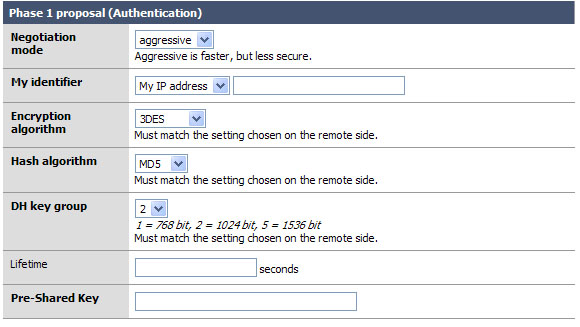
Okay the easy part of the VPN tunnel. The trick here, and even in phase 2, is to make sure that both VPN servers have EXACTLY THE SAME SETTINGS for all of these fields. Well okay, they will have different “My identifier” but make darn sure that they know each others names… more on that later.
Negotiation mode: This is the type of authentication security that will be used. Unless you are under close watch by someone with paranormal like craziness, just leave this as aggressive. It is indeed far faster and will insure that your VPN tunnel will rebuild itself quickly and probably won’t time out an application if the tunnel was down when the resource on the other end was requested. (more about that under Lifetime)
My identifier: This is the key to probably 90% of the email on the list where people seem to not get the VPN tunnel up, or want to know how to do this with dynamic IP addresses, etc. Very simple, set your identifier to something that is not going to change. So if you leave it as My IP address (* This will be the IP address of the “interface” you listed in the first section. *) then make sure that IP is static and persistent. If you use a DHCP assigned address then I would suggest using domain name instead This is because domain name can be completely your own even if you do not own the domain name. Make yours sexylovemonkey.com just for fun. ;)
Encryption Algorithm: 3DES is the world de facto… if you are connecting to another m0n0wall, or a system that will support it, change this to Blowfish. It is a more secure and about twice as fast! Now of course, if you are trying to connect to a VPN device that only supports DES then you will need to downgrade and hope no one decrypts your key exchange. MAKE SURE BOTH VPN DEVICES ARE USING THE SAME ENCRYPTION ALGORITHM.
Hash Algorithm: this is the hash used for checksum. MD5 is a good choice, SHA1 is the new up and comer and it is more reliable then MD5, but not all things support it. Again make sure you are using the same setting as the other end of the tunnel, and if you can use SHA1 go for it!
DH Key Group: Most systems will support at least up to 1024 bit. This is a good place to stick to, going with more will eat up more resources and less makes your tunnel less-secure.
Lifetime: This field is far more important then it appears. This lifetime, as opposed to the one in phase 2, is how long your end will wait for phase 1 to be completed. I suggest using 28800 in this field.
Preshared Key: Contrary to some suggestions this key must be exactly the same on both VPN routers. It is case sensitive, and it does support special characters. I suggest using both. E.x. f00m0nk3y@BubbaLand
Okay if you managed to coordinate and get both VPN systems set the same all should be good for phase 1. We really don’t want to stop here, so let’s go right into phase 2.
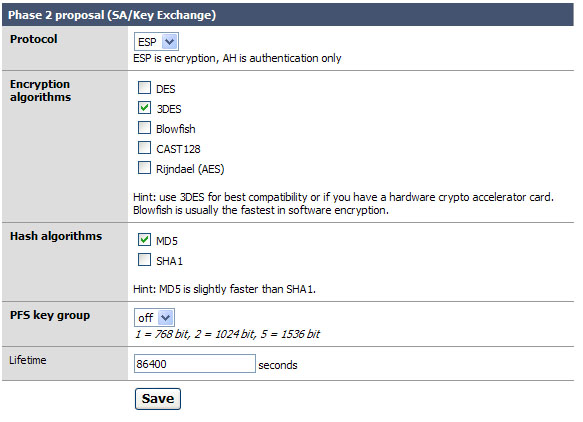
Phase 2 is what builds the actual tunnel, sets the protocol to use, and sets the length of time to keep the tunnel up when there is no traffic on it.
Protocol: ESP is the de facto on what most VPN systems use as a transport protocol. I suggest leaving this as is. Note: The system should auto generate a firewall rule for you to allow ESP or AH to the endpoint of the VPN. We will check this later, if it does not you will need to make a firewall rule allowing ESP (or AH if you changed this) traffic to the interface you established as your end point of the tunnel. I will outline that after figure 5.
Encryption algorithms: Ok here is the deal on this. Like before in phase 1, make sure you are setting the algorithm exactly as it is set on the other VPN server. You can use several; when you do so everything you select is available for use. Honestly I like to keep things simple so I recommend only checking the one you are going to use. With m0n0wall to m0n0wall use Blowfish for speed and security over 3DES.
Hash algorithms: again just as in phase 1 you want to make sure your selected hash matches the one on the other end. And like in step 2, don’t add things you don’t need. SHA1 is the suggestion if you can, but MD5 is always a good alternative.
PFS key group: this works exactly like it does in phase 1. I suggest using 1024 bit, the default is off.
Lifetime: This is the lifetime the negotiated keys will be valid for. Do not set this to too high of a number. E.g. more than about a day (86400) as doing so will give people more time to crack your key. Don’t be over paranoid either; there is no need to set this to 20 minutes or something like that. Honestly, one day is probably good.
Click Save
Click Apply Changes