m0n0wall Versions 1.2 and 1.3
Copyright © 2008 m0n0wall Documentation Project
All rights reserved.
Redistribution and use in any form, with or without modification, are permitted provided that the following conditions are met:
Redistributions must retain the above copyright notice, this list of conditions and the following disclaimer.
Neither the name of the m0n0wall Documentation Project nor the names of its contributors may be used to endorse or promote products derived from this documentation without specific prior written permission.
THIS DOCUMENTATION IS PROVIDED BY THE COPYRIGHT HOLDERS AND CONTRIBUTORS "AS IS" AND ANY EXPRESS OR IMPLIED WARRANTIES, INCLUDING, BUT NOT LIMITED TO, THE IMPLIED WARRANTIES OF MERCHANTABILITY AND FITNESS FOR A PARTICULAR PURPOSE ARE DISCLAIMED. IN NO EVENT SHALL THE COPYRIGHT OWNER OR CONTRIBUTORS BE LIABLE FOR ANY DIRECT, INDIRECT, INCIDENTAL, SPECIAL, EXEMPLARY, OR CONSEQUENTIAL DAMAGES (INCLUDING, BUT NOT LIMITED TO, PROCUREMENT OF SUBSTITUTE GOODS OR SERVICES; LOSS OF USE, DATA, OR PROFITS; OR BUSINESS INTERRUPTION) HOWEVER CAUSED AND ON ANY THEORY OF LIABILITY, WHETHER IN CONTRACT, STRICT LIABILITY, OR TORT (INCLUDING NEGLIGENCE OR OTHERWISE) ARISING IN ANY WAY OUT OF THE USE OF THIS DOCUMENTATION OR THE ASSOCIATED SOFTWARE, EVEN IF ADVISED OF THE POSSIBILITY OF SUCH DAMAGE.
March 2008

Table of Contents
List of Tables
- 1.1. CIDR Subnet Table
Table of Contents
m0n0wall is a project aimed at creating a complete, embedded firewall software package that, when used together with an embedded computer platform like a PC Engines device, provides all the important features of commercial firewall boxes (including ease of use) at a fraction of the price (free software). m0n0wall is based on a bare-bones version of FreeBSD, along with a web server, PHP and a few other utilities. The entire system configuration is stored in one single XML text file to keep things transparent.
m0n0wall is probably the first UNIX system that has its boot-time configuration done with PHP, rather than the usual shell scripts, and that has the entire system configuration stored in XML format.
m0n0wall already provides many of the features of expensive commercial firewalls, including:
web interface (supports SSL)
-
serial console interface for recovery
set LAN IP address
reset password
restore factory defaults
reboot system
wireless support (access point with PRISM-II/2.5/3 cards, BSS/IBSS with other cards including Cisco)
captive portal
802.1Q VLAN support
-
stateful packet filtering
block/pass rules
logging
NAT/PAT (including 1:1)
DHCP client, PPPoE, PPTP and Telstra BigPond Cable support on the WAN interface
IPsec VPN tunnels (IKE; with support for hardware crypto cards, mobile clients and certificates)
PPTP VPN (with RADIUS server support)
static routes
DHCP server and relay
caching DNS forwarder
DynDNS client and RFC 2136 DNS updater
SNMP agent
traffic shaper
SVG-based traffic grapher
firmware upgrade through the web browser
Wake on LAN client
configuration backup/restore
host/network aliases
The m0n0wall Quick Start Guide is intended to get m0n0wall up and running on a WRAP/ALIX embedded computer system. There will be descriptions on configuring two interfaces (LAN and WAN) setup. The m0n0wall Handbook contains the information you need to further configure your m0n0wall installation after completing this guide.
Note
The WRAP boards have been discontinued in 2007 and replaced with the more powerful ALIX boards. Older WRAP systems may still be available on eBay or from selected vendors.
This version of the Quick Start Guide is specifically tailored to the WRAP/ALIX platforms. If you are using Soekris hardware from Soekris, please see the Soekris Quick Start Guide and for PC hardware, please see the PC Quick Start Guide.
There are a number of example configurations in Chapter 9 of the m0n0wall Handbook. These configurations describe how to configure several things such as multiple LAN interfaces, setting up DMZ interfaces, wireless interfaces, etc. The base for adding those additional features will be the basic LAN/WAN setup this guide describes.
This chapter will go through the hardware and network information you need to gather to proceed through in this guide.
First, you need to make sure you have the following hardware.
WRAP/ALIX board
WRAP/ALIX case
WRAP/ALIX power adapter
-
Compact Flash card at least 16MB in size (8MB for m0n0wall 1.2 and earlier)
for best reliability, use a recognized brand, such as SanDisk
Compact Flash card reader/writer for another computer to install the software
Two network cables
Caution
Some PC Engine systems only have 1 Ethernet interface. These can be used with a mini-pci wireless card if it is supported by m0n0wall but these instructions require 2 Ethernet interfaces. If your system does not have 2 Ethernet interfaces then you will need to refer to the m0n0wall Handbook for setup information.
You'll need some information about your Internet connection. You'll need to know which category of the below list your Internet connection falls into, and the appropriate details. You can usually find these details on your ISP's website, and/or in paperwork you receive when you sign up for service. You can also call your ISP's technical support to get this information.
-
Static IP
- If you have a connection with a static IP, you will need to make note of your IP address, subnet mask, default gateway, and DNS server IP's.
-
DHCP
- If you have an Internet connection that uses DHCP, you need not gather any more information unless your ISP requires you to pass a certain DHCP hostname value (this is uncommon). If this is the case, you will need to check with your ISP to determine this hostname.
-
PPPoE
- Many DSL providers provide PPPoE or PPPoA service. Either of these is supported with the PPPoE WAN option. You will need to know your PPPoE username and password and possibly your service name (though this can usually be left blank).
-
PPTP
- A few ISP's require you to connect to them via PPTP. If your ISP requires this, you will need a username, password, local IP address, and remote IP address from your ISP.
-
BigPond
- This setting is for BigPond cable connections. You will need your username, password, and possibly authentication server and domain.
You will also need to know if you are connected directly to the Internet or if you are behind a modem or other device that is connected to the Internet. For example, maybe your Internet connection uses PPPoE but you have a PPPoE modem that receives the IP address from your Internet provider and then offers those network services to your internal network using DHCP or static IP.
Warning
The instructions for using the m0n0wall device are written with the idea that your m0n0wall has direct access to the Internet. If you have another device between your m0n0wall and the Internet that offers security or otherwise affects the network traffic (such as a proxy service, NAT device or port use limitations by your Internet provider) the configuration instructions and troubleshooting may not apply to your case.
Make note of the appropriate information for your connection type for later use.
Important
Be sure that you write down all of your existing Internet configuration BEFORE making changes to use your m0n0wall device. Once you have disconnected yourself from the Internet you will lose access to the numerous online help sources until you have re-established your connection.
The WRAP/ALIX hardware you choose will depend on what features you will use, how much bandwidth you have, and any add on devices that you wish to use. Since m0n0wall is based on FreeBSD 4, most hardware that works with FreeBSD also works with m0n0wall. See the FreeBSD/i386 Hardware Notes for a detailed listing of supported hardware.
Below is a list of some common WRAP/ALIX versions from PC Engines:
ALIX.1C (433 or 500 MHz AMD Geode LX800 / 1 LAN / 256 MB / CF socket / 2 Serial / 4 USB / 1 PCI / 1 LPT / audio / VGA / miniITX)
ALIX.2C0 (433 MHz AMD Geode LX700 / 128 MB / 2 LAN / CF socket / 1 Serial / 2 miniPCI)
ALIX.2C1 (433 MHz AMD Geode LX700 / 128 MB / 3 LAN / CF socket / 1 Serial / 1 miniPCI)
ALIX.2C2 (500 MHz AMD Geode LX800 / 256 MB / 2 LAN / CF socket / 1 Serial / 2 miniPCI / 2 USB)
ALIX.2C3 (500 MHz AMD Geode LX800 / 256 MB / 3 LAN / CF socket / 1 Serial / 1 miniPCI / 2 USB)
ALIX.3C1 (433 MHz AMD Geode LX700 / 128 MB / 1 LAN / CF socket / 1 Serial / 2 miniPCI)
ALIX.3C2 (500 MHz AMD Geode LX800 / 256 MB / 1 LAN / CF socket / 1 Serial / 2 miniPCI / 2 USB)
ALIX.3C3 (500 MHz AMD Geode LX800 / 256 MB / 1 LAN / CF socket / 1 Serial / 2 miniPCI / 2 USB / VGA / audio)
WRAP.1E-1 (233 MHz AMD Geode SC1100 / 128 MB / 2 LAN / CF socket / 2 miniPCI)
WRAP.1E-2 (233 MHz AMD Geode SC1100 / 128 MB / 3 LAN / CF socket / 1 miniPCI)
WRAP.2E (233 MHz AMD Geode SC1100 / 64 MB / 1 LAN / CF socket / 2 miniPCI)
WRAP.2E (233 MHz AMD Geode SC1100 / 128 MB / 1 LAN / CF socket / 2 miniPCI)
Some add on devices for PC Engines hardware might be:
vpn accelerator mini-pci card
wireless mini-pci card (A/B/G)
Note
The m0n0wall 1.3 releases are based on FreeBSD 6.2-RELEASE. The Hardware Notes for this version is different than the older FreeBSD 4.x versions.
Processor
For most broadband connections, any 100MHz or faster processor will be sufficient. For example, if you have less than 10 Mb of Internet bandwidth (combined upload and download speed), an embedded device like the WRAP or Soekris platforms will suffice. For 10 Mb up to a full T3 or more, a 500MHz system like the newer Soekris, ALIX, or embedded device like a NexCom is more appropriate. See Chapter 2 of the Users Guide for further details on compatible hardware.
For connections faster than a T3 using many VPN sessions, you will likely want to use a customized version of m0n0wall specifically built for your requirements, and high end Pentium 4, Xeon, or similar hardware. This is beyond the scope of this document.
RAM
We recommend an embedded system with at least 64 MB of RAM. More memory is particularly useful for VPN connections. Hard drive or CF installs are not recommended with less than 64 MB RAM because you will probably run out of RAM during upgrades and m0n0wall has no swap, so the upgrade will fail.
Hardware Sizing
Keep in mind there is no standard "if you have X Internet connection and Y number of machines on your network, then you need Z hardware". It varies depending on what services you will use, and your Internet traffic characteristics. The one thing that will require significantly more CPU, and/or a VPN accelerator card, is if you'll require more than a couple Mbps of VPN traffic for extended periods.
Some examples of non-encrypted network throughput can be found below, when using the default configuration. Please note that some of these results were reported by users and not officially tested by a developer of the m0n0wall code. Additional information can be found on this FAQ entry.
Soekris net4501, WAN <-> LAN TCP throughput of about 17 Mbps, including NAT
Soekris net4801, throughput in excess of 50 Mbps
PC Engines ALIX.1, throughput in excess of 90 Mbps
Soekris net5501-70 500Mhz 512M RAM, 84 Mbps
Liantec 5842 with OpenBSD 4.0, 395Mbps
New standard PCs, > 100 Mbps (depending on Ethernet cards used)
Sempron 2800+ (1.6GHz) using Intel Pro 1000 PT pci-e card, 760Mbps
Sempron 2800+ (1.6GHz) using Intel Pro 1000 GT pci card, 400Mbps
Some encryption speeds are shown below. Please note that speed will change based on the number of concurrent connections and the type of encryption being used.
Soekris net4801, 3DES-MD5 IPSec encryption, 3.5Mb/s
Network Cards
You will need at least two network interfaces in the hardware you are using. If the PC Engines system that you have selected has a PCI interface you can add an additional PCI based ethernet card. Most any PCI based cards are compatible with m0n0wall but be sure that whatever card you use has been tested with the PC Engines system, check the Users Guide for further details.
For this document, we will assume there are two Ethernet interfaces. You can have additional interfaces installed in the system, but do not configure them during these quick installation procedures. Documentation in the Users Guide will soon be available to assist you in setting up additional LAN interfaces, DMZ interfaces, wireless setups, etc.
Tip
You should write down the MAC hardware addresses of each Ethernet interface if possible. During the configuration of m0n0wall, the Ethernet interfaces will be identified by these addresses. If you do not know them in advance you may need to do some tests to find out which network card has been selected for the LAN and which network has been selected for the WAN. MAC addresses look like 00:1c:b3:bb:80:42.
m0n0wall will run off of a Compact Flash card or a hard drive. In most cases you will use a Compact Flash card with the PC Engines embedded systems but some of these systems support IDE or SATA drives. The pros and cons of each follow. Although you can choose the one most appropriate for your situation, the rest of this Quick Start guide will assume that you are using a Compact Flash card. Both Compact Flash and hard drive installations are remotely upgradeable via the webGUI.
CompactFlash
CompactFlash (CF) is a good choice for most any deployment. CF cards are more reliable than hard drives and the floppy drives that hold the configuration in the CD/floppy setup, and are remotely upgradeable via the webGUI. The downside is you might spend more money getting a CF setup working. If you are not using an embedded device with an onboard CF adapter, you will have to spend about $10 USD on a IDE to CF adapter. You'll need to purchase a CF card at least 16 MB in size.
I purchase used 16 MB CF cards off eBay to use for m0n0wall installations, and get them for $5-$10 USD each. You may also need a CF reader on your PC to write the m0n0wall image to the CF card. Those are approximately $30 USD. So you could be looking at a total expenditure of about $50 USD. But most any business environment should be able to justify such a small expenditure for the increase in reliability.
Hard Drive
Hard drives are readily available but most embedded systems will not support them. The likelihood of a hard drive failure is pretty high, given that the hardware being used is likely old. They can also get very warm with high disk activity and since the embedded systems discussed here do not include ventilation, this might be important in your choice.
If you have an extra IDE interface you can still use it with an IDE to CompactFlash adapter. Such an adapter can be purchased new for about $10 USD. PC Engines sells them, amongst other vendors.
m0n0wall uses a subnet mask format that you may not be familiar with. Rather than the common 255.x.x.x, it uses CIDR (Classless InterDomain Routing) notation.
You can refer to the following table to find the CIDR equivalent of your subnet mask.
Table 1.1. CIDR Subnet Table
| Subnet Mask | CIDR Prefix | Total IP's | Usable IP's | Number of Class C networks |
|---|---|---|---|---|
| 255.255.255.255 | /32 | 1 | 1 | 1/256th |
| 255.255.255.254 | /31 | 2 | 0 | 1/128th |
| 255.255.255.252 | /30 | 4 | 2 | 1/64th |
| 255.255.255.248 | /29 | 8 | 6 | 1/32nd |
| 255.255.255.240 | /28 | 16 | 14 | 1/16th |
| 255.255.255.224 | /27 | 32 | 30 | 1/8th |
| 255.255.255.192 | /26 | 64 | 62 | 1/4th |
| 255.255.255.128 | /25 | 128 | 126 | 1 half |
| 255.255.255.0 | /24 | 256 | 254 | 1 |
| 255.255.254.0 | /23 | 512 | 510 | 2 |
| 255.255.252.0 | /22 | 1024 | 1022 | 4 |
| 255.255.248.0 | /21 | 2048 | 2046 | 8 |
| 255.255.240.0 | /20 | 4096 | 4094 | 16 |
| 255.255.224.0 | /19 | 8192 | 8190 | 32 |
| 255.255.192.0 | /18 | 16,384 | 16,382 | 64 |
| 255.255.128.0 | /17 | 32,768 | 32,766 | 128 |
| 255.255.0.0 | /16 | 65,536 | 65,534 | 256 |
| 255.254.0.0 | /15 | 131,072 | 131,070 | 512 |
| 255.252.0.0 | /14 | 262,144 | 262,142 | 1024 |
| 255.248.0.0 | /13 | 524,288 | 524,286 | 2048 |
| 255.240.0.0 | /12 | 1,048,576 | 1,048,574 | 4096 |
| 255.224.0.0 | /11 | 2,097,152 | 2,097,150 | 8192 |
| 255.192.0.0 | /10 | 4,194,304 | 4,194,302 | 16,384 |
| 255.128.0.0 | /9 | 8,388,608 | 8,388,606 | 32,768 |
| 255.0.0.0 | /8 | 16,777,216 | 16,777,214 | 65,536 |
| 254.0.0.0 | /7 | 33,554,432 | 33,554,430 | 131,072 |
| 252.0.0.0 | /6 | 67,108,864 | 67,108,862 | 262,144 |
| 248.0.0.0 | /5 | 134,217,728 | 134,217,726 | 1,048,576 |
| 240.0.0.0 | /4 | 268,435,456 | 268,435,454 | 2,097,152 |
| 224.0.0.0 | /3 | 536,870,912 | 536,870,910 | 4,194,304 |
| 192.0.0.0 | /2 | 1,073,741,824 | 1,073,741,822 | 8,388,608 |
| 128.0.0.0 | /1 | 2,147,483,648 | 2,147,483,646 | 16,777,216 |
| 0.0.0.0 | /0 | 4,294,967,296 | 4,294,967,294 | 33,554,432 |
The CIDR number comes from the number of 1's in the subnet mask when converted to binary.
The common subnet mask 255.255.255.0 is 11111111.11111111.11111111.00000000 in binary. This adds up to 24 1's, or /24 (pronounced 'slash twenty four').
A subnet mask of 255.255.255.192 is 11111111.11111111.11111111.11000000 in binary, or 26 1's, hence a /26.
And so on...
Table of Contents
The instructions below will have you download a m0n0wall file called an image that contains the bootable operating system. This image will be written to a Compact Flash card. Finally you will install the Compact Flash card into the WRAP/ALIX system and connect the ethernet cables.
It is assumed that you have a working PC computer with the proper Ethernet cables and the default BIOS options chosen to boot from a Compact Flash card. These instructions are for a Windows, FreeBSD or Linux operating system.
Because the Compact Flash card is writable, your customized changes to the default configuration will be stored in the card itself and be used for subsequent reboots of the WRAP/ALIX embedded system. In all cases the configuration file can be downloaded from the web interface for external storage.
Tip
It is recommended to always store an external backup of your configuration file in case of emergencies.
It might save you some troubleshooting time if you first verify that your system is in working condition. One easy way to do this is to boot the PC Engines system while connected to the serial console interface (see your PC Engines documentation for how to do this.) you can then verify that the entire system is ready to run m0n0wall.
Warning
Some configurations of the PC Engine systems have difficulties booting from either certain types of Compact Flash cards or when a Compact Flash card and a disk drive are connected at the same time. Try to pick a Compact Flash card that is known to boot or that has been discussed in the PC Engines mailing list.
To download a WRAP/ALIX image file, point your web browser to http://www.m0n0.ch/wall/downloads.php and select the wrap-xxx.img download link from that page, depending on the model of your board. Download the file to the machine from which you will be writing to the CompactFlash card.
If you are installing to a standard PC using an IDE or CF disk, you need to write the image to a sufficiently large CF card or hard disk (at least 10 MB for the generic-PC image in version 1.3). Extra space on the CF card or drive is ignored; there is no benefit to using one larger than 16 MB other than possibly compatibility on future releases.
The following sections will cover how to write the CF card in Windows, FreeBSD, and Linux. A summary is below with details following for each operating system.
-
Windows:
(use the -u flag if the target disk is > 800 MB - make very sure you've selected the right disk!!)
physdiskwrite [-u] generic-pc-xxx.img
(you must use v0.3 or later!)
-
FreeBSD:
gzcat generic-pc-xxx.img | dd of=/dev/rad[n] bs=16k
where n = the ad device number of your CF card (check dmesg) (ignore the warning about trailing garbage - it's because of the digital signature)
-
Mac OS X:
sudo gzcat wrap-1.xxx.img | dd of=/dev/diskX bs=16k
where X = the IDE device name of your HD/CF card (check with diskutil list or Disk Utility) - (ignore the warning about trailing garbage - it's because of the digital signature)
-
Linux:
gunzip -c generic-pc-xxx.img | dd of=/dev/hdX bs=16k
where X = the IDE device name of your HD/CF card (check with hdparm -i /dev/hdX) - some CF adapters, particularly USB, may show up under SCSI emulation as /dev/sdX (ignore the warning about trailing garbage - it's because of the digital signature)
For Windows you will be downloading physdiskwrite from the m0n0wall web site. This is a small Windows NT/2000/XP command line tool that makes it possible to write disk images onto raw disks, like CF cards. It currently has a few rough edges, most notably in the selection of the device to be written – you have to decide which device is the right one by looking at the C/H/S values (though if the CF card was the last device to be connected to the system, it usually shows up as the last one in the list).
Note that the C/H/S values may be incorrect for CF cards – looks like this is a bug in Windows. There is some protection against accidentally overwriting your hard disk, but then again, I CAN'T TAKE ANY RESPONSIBILITY FOR LOST DATA – YOU USE THIS PROGRAM ON YOUR OWN RISK.
Manuel Kasper's (author of m0n0wall) physdiskwrite should be used on Windows to write the CF card. Download it from the m0n0wall web site's physdiskwrite page.
Note
Note to Windows Vista users: physdiskwrite works with Vista, but you must make sure to run it as administrator (simply having admin rights isn't enough), or it won't find any disks. One way to do this is to create a shortcut to cmd.exe, then right-click it and select "run as administrator". Then you can launch physdiskwrite from the command prompt window that appears, and it should work fine.
Save physdiskwrite.exe and the downloaded m0n0wall image in the same directory on your hard drive, then open a Windows Command Prompt (click Start, Run, type in cmd and click OK).
Plug in your CF card reader/writer and insert your CF card. If you are connecting your hard drive you can either connect it directly to your computer or through a fire wire or USB adaptor for external drives.
'cd' into the directory containing physdiskwrite and the m0n0wall image and run the following:
physdiskwrite wrap-xxx.img
Replacing wrap-xxx.img with the name of the WRAP/ALIX image you downloaded.
Tip
Windows users can just simply drag-and-drop the image file onto the physdiskwrite.exe icon.
You will see output similar to the following:
physdiskwrite v0.5 by Manuel Kasper <mk@neon1.net>

Searching for physical drives...

Information for \\.\PhysicalDrive0:
   Windows:       cyl: 14593
                  tpc: 255
                  spt: 63
   C/H/S:         16383/16/63
   Model:         ST3120026A
   Serial number: 3JT1V2FS
   Firmware rev.: 3.06

Information for \\.\PhysicalDrive1:
   Windows:       cyl: 1
                  tpc: 255
                  spt: 63
You will see all the hard drives in your system listed, as well as the compact flash card. Since we did not run physdiskwrite -u, physdiskwrite will refuse to write to any drive over 2 GB. This is a protection so you don't accidentally overwrite your hard drive.
Warning
If you are using physdiskwrite.exe to write to a second hard disk be very careful that you identify the correct disk before writing to it (i.e. do not write the image to your own computer's boot disk).
The procedures to image a CompactFlash card depend upon the type of adapter you are using. The CF card will either appear as a SCSI or IDE hard drive.
Run the command atacontrol list. You will get output similar to the following:
su-3.00# atacontrol list
ATA channel 0:
Master: ad0 <WDC WD200EB-75CSF0/04.01B04> ATA/ATAPI revision 5
Slave: ad1 <WDC WD800AB-22CBA0/03.06A03> ATA/ATAPI revision 5
ATA channel 1:
Master: acd0 <_NEC CD-RW NR-7800A/10DA> ATA/ATAPI revision 0
Slave: no device present
Then run the command camcontrol devlist. You will see output similar to the following:
su-2.05b# camcontrol devlist
<ADAPTEC RAID-5 320R> at scbus2 target 0 lun 0 (pass0,da0)
<SEAGATE ST39204LC 0005> at scbus2 target 3 lun 0 (pass1,da1)
<ESG-SHV SCA HSBP M10 0.05> at scbus2 target 6 lun 0 (pass2)
You will find your CF card somewhere in the above output. Make note of its device name (adX or daX).
Run the following command, replacing adX with your CF device as determined above, and net45xx-xxx.img with the name of the m0n0wall image you downloaded.
gzcat wrap-xxx.img | dd of=/dev/adX
        bs=16k
Ignore the warning about trailing garbage - it's because of the digital signature.
It is important to identify the Disk number that is assigned to your connected compact flash drive and to unmount and opn partitions before writing the CF image. You will be asked for your administrator password when running the command.
Tip
If your Compact Flash has not been previously formatted or is in a format not readable by MacOSX, you will receive a message saying that the CF card is not readable and asking if you want to format it. Choose the IGNORE button.
Run the command diskutil list. You will get output similar to the following (this was using a 64Mb Compact Flash card and a generic USB CF reader):
myHome-Computer:Downloads myhome$ diskutil list
/dev/disk0
   #:      TYPE NAME                    SIZE       IDENTIFIER
   0:      GUID_partition_scheme        *74.5 Gi    disk0
   1:      EFI                           200.0 Mi   disk0s1
   2:      Apple_HFS Macintosh HD        74.2 Gi    disk0s2
/dev/disk1
   #:      TYPE NAME                    SIZE       IDENTIFIER
   0:                                   *61.2 Mi    disk1
Then optionally run the command diskutil info diskX to get more information on th disk. You will see output similar to the following (in this case the Compact Flash card was assigned disk1.):
myHome-Computer:Downloads myhome$ diskutil info disk1
   Device Identifier:        disk1
   Device Node:              /dev/disk1
   Part Of Whole:            disk1
   Device / Media Name:      Honestar USB Storage-CFC Media

   Volume Name:
   Mount Point:

   Partition Type:
   Bootable:                 Not bootable
   Media Type:               Generic
   Protocol:                 USB
   SMART Status:             Not Supported

   Total Size:               61.2 Mi (64225280 B) (125440 512-byte blocks)
   Free Space:               0.0 B (0 B) (0 512-byte blocks)

   Read Only:                No
   Ejectable:                Yes
   Whole:                    Yes
   Internal:                 No
   OS 9 Drivers:             No
   Low Level Format:         Not Supported
Tip
You can also find the Disk Identifier by running Open Disk Utility (Applications > Utilities > Disk Utility). Find the CF card that you will be writing to on the menu and be sure to unmount any mounted partitions on that disk.
You will find your CF card somewhere in the above output. Make note of its device name (diskX).
sudo dd if=wrap-1.3b10.img of=/dev/diskX bs=16k
where X = the IDE device name of your HD/CF card (check with diskutil list or Disk Utility) - (ignore the warning about trailing garbage - it's because of the digital signature). You will see output similar to the following (in this case the Compact Flash card was assigned disk1.):
myHome-Computer:Downloads myhome$ sudo dd if=wrap-1.3b10.img of=/dev/disk1 bs=16k
Password:
435+1 records in
435+1 records out
7139303 bytes transferred in 8.071781 secs (884477 bytes/sec)
gunzip -c wrap-xxx.img | dd of=/dev/hdX bs=16k
where X = the IDE device name of your CF card (check with hdparm -i /dev/hdX) - some adapters, particularly USB, may show up under SCSI emulation as /dev/sdX.
Ignore the warning about trailing garbage - it's because of the digital signature.
Now put your written CF card into your WRAP board, and put it in its case.
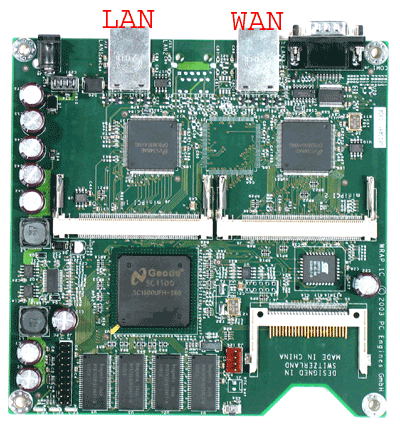
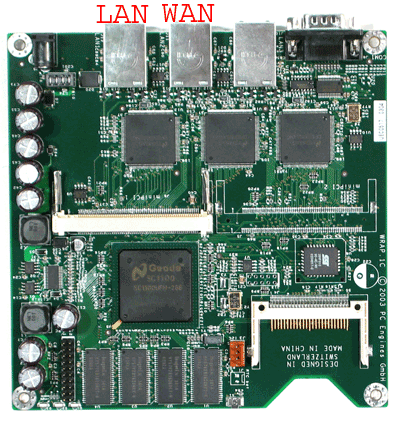
The LAN and WAN interfaces are pre-assigned on the WRAP/ALIX images. See below for photos of these pre-assigned board configurations.
Plug the LAN interface into the hub or switch that is connected to your LAN. Plug the WAN interface into your Internet connection (DSL or cable modem, router, etc.) Additional Network interfaces can optionally be connected to other routers, hubs or an Ethernet capable device.
Tip
If your Ethernet devices have built-in LEDs to show connectivity, verify that connected links are showing a green LED when the devices are physically powered on. If it is not showing green then there may be a problem with the cable (damaged or incorrect wiring) or with one of the Ethernet interfaces.
On the two Ethernet port models, the LAN port is the port closest to where the power adapter plugs in, and the WAN port is the port closest to the serial port.
Finally, plug the LAN interface into the hub or switch that is connected to your LAN. Plug the WAN interface into your Internet connection (DSL or cable modem, router, etc.)
After plugging in your interfaces, plug in the power source of your WRAP/ALIX system to turn it on.
Table of Contents
By default, m0n0wall enables its DHCP server on its LAN interface, and configures the LAN interface with IP address 192.168.1.1. If you have an existing DHCP server, and/or wish to use a different IP subnet on your LAN, you will need to first connect via the WRAP/ALIX's serial console interface.
Note
Unless you know what you're doing, we strongly recommend not changing the LAN IP address or pre-configured DHCP settings to avoid difficulties caused by misconfiguration.
If you do not need to change the interface assignments, LAN IP address, or DHCP server settings, you can skip ahead to the next chapter. Otherwise, below are steps to make changes to the default configuration using your m0n0wall system's serial console interface.
Note
The default configuration for m0n0wall does not activate a wireless interface, even if one is installed. That means that you can not change the default configuration using only a wireless connection. You must be connected by Ethernet or Serial console cable to make the first configuration change.
Most ALIX boards from PC Engines have serial console interfaces. However boards with video interfaces like the ALIX.3c3 and the mini-itx size ALIX board do not run tinyBIOS and do not have serial console interfaces. These boards are running a version of Award BIOS and the user is expected to use the video interface itself with a USB keyboard to access the console.
First you need a null modem cable, not a straight through serial cable. For the appropriate pin-out, see this page. You can purchase a null modem cable at most any store that carries computer cables, or from a variety of online sources. (Froogle link for null modem cables).
MacOSX users and PC users that do not have a serial console interface can purchase a USB to Serial DB9 adaptor from their local computer store. Additionally, some PC motherboard BIOS settings may have the serial interface disabled or being used by an internal modem. If you experience problems below, verify that your serial interface is activated.
Connect the null modem cable to your embedded device and PC.
For Windows users, HyperTerminal isn't great, but it gets the job done. You can find it under Start, Programs, Communications, HyperTerminal. If you cannot find it on your system, you can download it for free here.
Caution
Windows Vista does not include HyperTerminal. You can either download the free Private Edition of HyperTerminal or use another software such as PuTTY.
After opening HyperTerminal, you will see the New Connection screen.
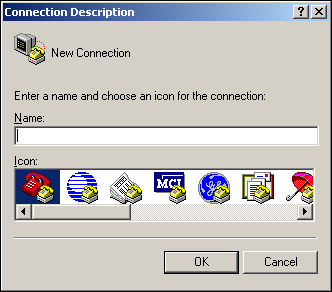
Type in something for the connection name and click OK.
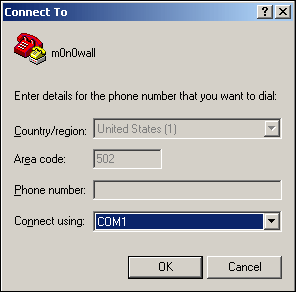
Next, you'll see the "Connect to" screen. Select the COM port number of the serial port in your PC. If you do not know which it is, trial and error might be the easiest way to determine this. Start with COM1, and try other ports if necessary. In this case, I know my serial port is COM1.
Now you'll see the Connection Properties screen. If you have changed the console speed on your WRAP/ALIX, you will need to change the "Bits per second" field accordingly. If you are unsure on what this speed is please check the documentation of your WRAP/ALIX system.
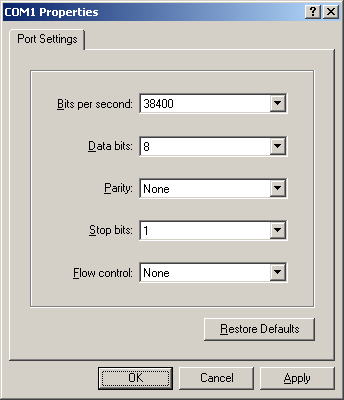
Click OK after filling in the Connection Properties appropriately, and you will have a blank HyperTerminal screen. Now power on your device.
MacOSX users can use Terminal Emuation software such as Zterm to access the console settings.
Your system is now ready to be configured from the console. You are able to view the console at 38400 bps and have the media you loaded with m0n0wall earlier installed in the target machine.
When your system finishes booting, you will see the m0n0wall console.
*** This is m0n0wall, version 1.2
    built on Sun Aug 22 11:41:15 CEST 2004 for WRAP
    Copyright (C) 2002-2005 by Manuel Kasper. All rights reserved.
    Visit http://m0n0.ch/wall for updates.


    LAN IP address: 192.168.1.1

    Port configuration:

    LAN  -> sis0
    WAN  -> sis1


m0n0wall console setup
**********************
1) Interfaces: assign network ports
2) Set up LAN IP address
3) Reset webGUI password
4) Reset to factory defaults
5) Reboot system
Although this example shows sis0 and sis1 as the two Ethernet interfaces these names depend on the Ethernet cards that are installed. These 4 characters simply identify the driver used to access the Ethernet card and the number of cards that are using the same driver. Other possible Ethernet interface names include, but are not limited to: bge, em, gx, nge, ti, txp, dc, fxp, sis, ste, tl, tx, xl.
First I will explain the purpose of each menu option.
Option 1 allows you to assign network interfaces to be used for LAN, WAN, and OPT networks, as well as allowing you to configure VLAN's.
Option 2 allows you to set the LAN IP address to something other than the default 192.168.1.1.
Option 3 allows you to reset the webGUI password if you have forgotten it.
Option 4 lets you reset the system to factory default configuration. If you get stuck at some point during configuration, sometimes it is easier to start over from scratch.
Option 5 lets you reboot the system.
Press 1 at the console setup screen if you wish to reassign your network interfaces.
Note
To avoid potential problems with mis-assignment, we recommend leaving your interface assignments as is.
On a three Ethernet port WRAP, sis0 is the NIC closest to the power adapter connector, sis1 is the middle Ethernet port, and sis2 is the Ethernet port closest to the serial port.
On a two Ethernet port WRAP, sis0 is the NIC closest to the power adapter connector, and sis1 is the NIC closest to the serial port.
Enter a number: 1

Valid interfaces are:

sis0    00:0c:29:96:5e:de
sis1    00:0c:29:96:53:e8

Do you want to set up VLANs first?
If you're not going to use VLANs, or only for optional interfaes, you
should say no here and use the webGUI to configure VLANs later, if required.

Do you want to set up VLANs now? (y/n)
As this guide only leads you through a simple two interface configuration, we will press n and hit enter here to skip VLAN configuration. If you need VLAN support, configure it in the webGUI after this initial configuration is complete. You can use the Valid interfaces list to see how your installed Ethernet cards are identified by the m0n0wall operating system.
If you don't know the names of your interfaces, you may choose to use
auto-detection.  In that case, disconnect all interfaces before you begin,
and reconnect each one when prompted to do so.

Enter the LAN interface name or 'a' for auto-detection:
Enter the name of the desired LAN interface (sis0 or sis1 on a two port WRAP/ALIX, sis0, sis1, or sis2 on a three port WRAP/ALIX) and press Enter.
Enter the WAN interface name or 'a' for auto-detection
(or nothing if finished):
Enter one of the remaining available interfaces and press Enter.
Next you will be prompted for assigning optional interfaces. You can do this later through the webGUI if need be. Without entering anything, hit ENTER at this prompt.
Enter the Optional 1 interface name or 'a' for auto-detection
(or nothing if finished):
You will now see how your interfaces have been configured.
The interfaces will be assigned as follows:

LAN  -> sis1
WAN  -> sis0

The firewall will reboot after saving the changes.

Do you want to proceed? (y/n)
This confirms how the interfaces will be assigned. Press y and hit enter here to restart the firewall for the changes to take effect. To discard your changes, enter n and press Enter. If all of your hardware and cables are correctly installed you should be able to reach the m0n0wall at the 192.168.1.1 IP address from a client computer.
View this tutorial for a how to on changing your LAN IP address and/or DHCP server settings.
Table of Contents
Now you need to get one of your client machines configured so you can access the webGUI to finish the configuration. A client machine is any Ethernet device (such as a computer, network printer or scanner, network camera...) that is connected to the LAN network of the m0n0wall PC. These devices will use the m0n0wall PC to reach the Internet and they will be protected by your m0n0wall configuration.
If you are using the DHCP server built-into the m0n0wall system, these client machines will be receiving all of their IP configuration from the WRAP/ALIX system running m0n0wall, even if they are not expected to connect to the Internet.
Tip
If you have any servers in your LAN network such as a file or print server, you will want them to have fixed, non-changing IP addresses. Either assign them a fixed DHCP address or a static IP address.
If you aren't familiar with networking, the easiest thing to do is set all your client machines to obtain their IP address from DHCP. m0n0wall enables its DHCP server on the LAN interface by default.
If you are going to use your m0n0wall as a DHCP server, set the client computer you will be using to access the webGUI to obtain its IP address using DHCP. Then release and renew your DHCP lease and you will get a lease from m0n0wall. The procedures to release and renew vary by the client machine's operating system, but if you don't know how to do this, a reboot of the client computer will achieve the same result.
If you have an existing DHCP server on your LAN, you just need to set your m0n0wall's LAN IP address as the default gateway address assigned by your DHCP server. This is because your LAN traffic is expected to be going through the LAN interface of your m0n0wall PC so that m0n0wall can protect your network traffic.
When you get into the webGUI, you'll need to disable m0n0wall's DHCP server. You can also disable it from the console as described in the last chapter.
If you want to use a static IP address on your client machines, be sure to configure them in the same subnet as your m0n0wall LAN interface, using the appropriate DNS servers and the m0n0wall LAN IP address as the default gateway.
We recommend you stick with DHCP at least initially to reduce the likelihood of problems.
Table of Contents
Now that we have the client machines configured appropriately, the interfaces assigned and LAN IP address configured, and the m0n0wall has rebooted with its new configuration, we will log into the webGUI and finish the configuration.
Open your web browser and go to http://192.168.1.1 (if you changed your LAN IP address in the console setup, replace 192.168.1.1 with your LAN IP throughout the remainder of this documentation).
You will be prompted for a username and password. Enter username admin and password mono. You are now logged into the webGUI.

First click "General Setup".
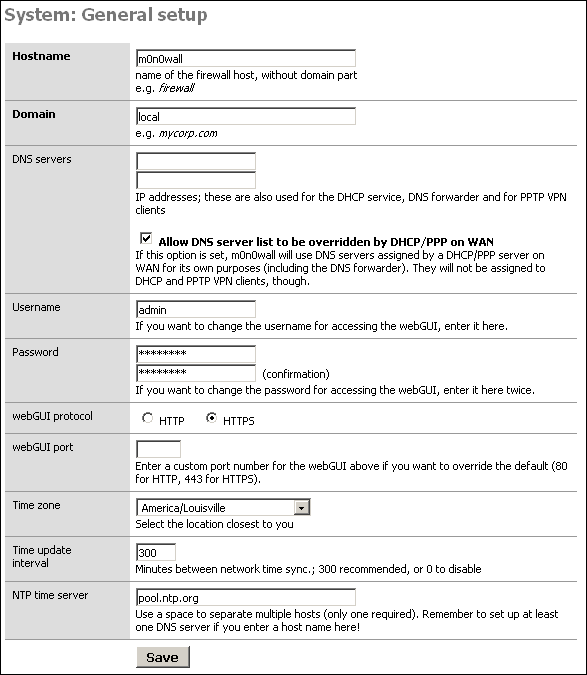
Hostname and Domain
If you wish to change the hostname and domain of your m0n0wall, you can do so in the first two boxes on this screen. If you use m0n0wall as your DNS server, this name will resolve to your LAN IP address. i.e. you can access your webGUI using http://m0n0wall.local or whatever you set the hostname and domain to be.
DNS Servers
If you have a static IP from your ISP, you need to enter the IP addresses of your ISP's DNS servers in these two boxes. Use one IP address per box. If you get your IP address from your ISP via DHCP, leave these boxes blank. If you want to use DNS servers on your LAN, enter their IP addresses here. You can only use one DNS server by filling in the top box and leaving the bottom one blank.
If your ISP uses DHCP and you wish to use the DNS servers the ISP's DHCP server provides, leave the "Allow DNS server list to be overridden by DHCP/PPP on WAN" box checked. If you are using DHCP on the WAN and wish to use DNS servers other than the ones provided by your ISP, uncheck this box.
Username and Password
If you wish to change the username from the default "admin", change the username box appropriately.
It is important that you change your password from the default "mono" by typing in a password of your choosing in the password field and typing it again to confirm in the second field.
webGUI protocol and port
Here you should change the protocol from HTTP to HTTPS so your username and password and configuration details are encrypted while in transit over your LAN.
If you want to make it a little more difficult to find your webGUI logon page, change the port number here. Just remember you will have to put that port number in the URL when logging into the webGUI. For example, if you set this port to 5555, and switch to HTTPS, you will have to use https://192.168.1.1:5555 to access the webGUI.
Time Zone
Select your time zone from this drop down box. This includes all of the time zones from FreeBSD. I am in Louisville, Kentucky, USA, which has its own entry under America/Louisville that I will select. You can likely find a city in the same time zone, or at least find the name of your time zone.
Time Update Interval
m0n0wall has a NTP client built in that by default will synchronize its time to a NTP server every 300 minutes (5 hours). To change the frequency of this update, change this box. Enter 0 to disable NTP clock synchronization (not recommended).
NTP Time Server
This specifies which NTP server m0n0wall will use to synchronize its time. You can leave it at pool.ntp.org unless you have a reason to change it. You might want to change this, for example, to synchronize to a central NTP server on your LAN.
Now review all of your changes on this screen, and when you are satisfied with them, click Save. You'll see notification that the changes were applied successfully.
Now we will configure your WAN interface. At this point, you will need some information from your ISP. The WAN connection types available are DHCP, static IP, PPPoE, PPTP, and BigPond. Chances are you will be using DHCP, static IP, or PPPoE.
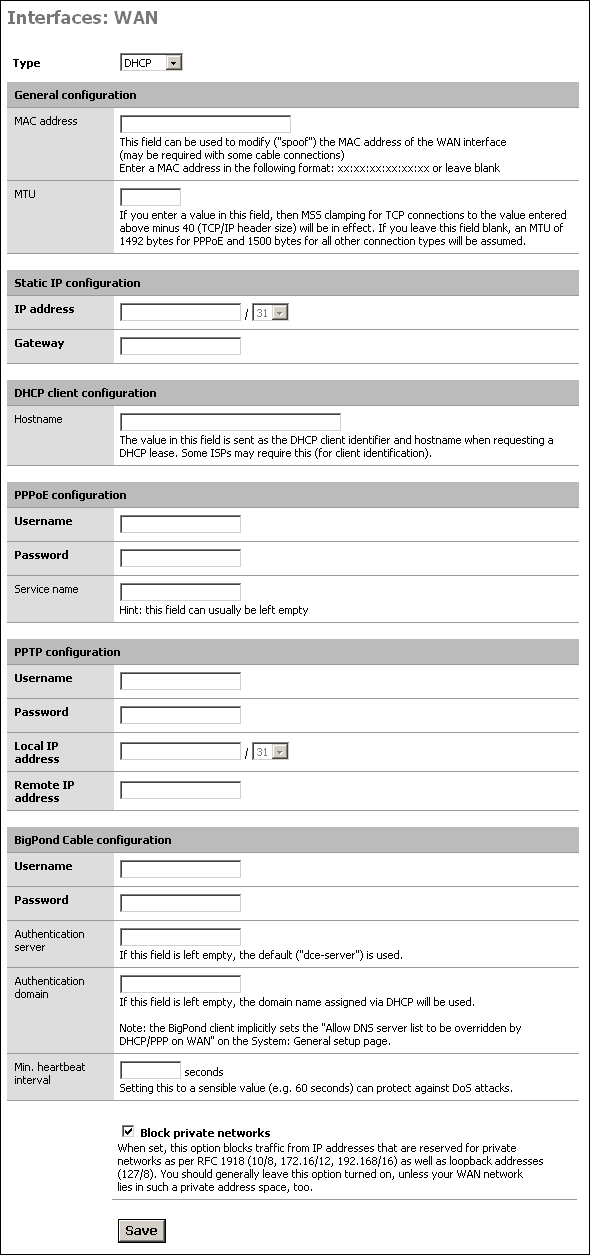
In the Type drop down box, you have five choices. Choose accordingly for the information you gathered earlier, and fill in any necessary information for your connection type.
Under "General configuration" on this screen, you can change the MAC address of the WAN interface and change the MTU.
MAC address
Some ISP's keep the MAC address of the device you have connected to their network, and only allow that device access. There is typically a process to register a new device, though sometimes that may require contacting the ISP. To avoid this, you can enter the MAC address of the network card you previously used on your broadband connection to make your ISP think you still have the same device connected.
MTU
Unless you have a very good reason for changing it, leave the MTU alone.
Unless your WAN subnet lies in private IP address space, leave this box checked. It protects you from some IP spoofing attempts.
So you now have m0n0wall configured and working - now what next?
If you are running m0n0wall, we strongly suggest subscribing to the announcements mailing list by sending a blank email to <m0n0wall-announce-subscribe@lists.m0n0.ch>. This is a very low volume list that can only be posted to by Manuel Kasper. It might get 10 messages a year. It's important to subscribe so you are kept up to date on any new releases, and will know if any security issues are discovered.
There might also be an announcements list for your embedded system. Check their website to see if this is available.
You might also wish to subscribe to the documentation updates list if you want to keep up to date on major changes to the m0n0wall documentation. Send a blank email to <m0n0wall-doc-announce-subscribe@lists.m0n0.ch> to subscribe. This list can only be posted to by Chris Buechler, and is very low volume with typically less than 10 messages per year.
m0n0wall is capable of much more than the basic two interface LAN/WAN setup you now have running. Peruse the m0n0wall Handbook for information on implementing more of m0n0wall's capabilities.
Some of the problems you may run into in the process of following this guide, and their associated troubleshooting steps follow.
Cannot access Internet from LAN after configuring WAN Interface
- DHCP
Dynamic Host Configuration Protocol.
- LAN
Local Area Network. A network that typically includes computers which are physically close, such as in one office, usually connected with hubs and switches rather than routers.
- NIC
Network Interface Card. A.k.a. network card, or Ethernet card.
- NAT
-
Network Address Translation. A technique whereby IP traffic from multiple IP addresses behind a firewall are made to look to the outside as if they all come from a single public IP address.
See Also Wikipedia Network Address Translation page .
- WAN
-
Wide Area Network. A network that spans a large area, typically including routers, gateways, and many different IP networks.
In the context of firewalls, the WAN interface is the one directly connected to the Internet.